Our lives are constantly flooded with information destined from the digital world: the sound of a Slack message on the laptop, a WhatsApp message popping up on the watch, or the email push notifications making our phones buzz incessantly. The screens we surround ourselves with are little black holes that are constantly teasing us with a snippet of information, knowing that we can't avoid getting sucked in to see more.
For a while, I've been toying with the idea of building a physical device that could sit peacefully in my living space and convey important information about a select part of my digital life in a minimalistic, non-obtrusive way. Something with a visual language so simple that I would be able to process a message immediately, without having to stop what I'm doing to parse and make sense of pixels on a screen.
A few years back, I completely fell in love with the Paper Signals experiment from Google. A cute little arrow pointing up or down, or an umbrella opening and closing is exactly the kind of simplicity I wanted.
This idea stayed at the back of my mind for a long time, and a few months ago I decided to build my own Internet-connected physical device.
¶ A traffic light
I created a list of ideas and possible formats, based on capabilities and hardware requirements. In the end, the winner was... a traffic light.
For one, it communicates in a language that is pretty much universal (albeit with some regional variations). And, most notably, the language is much more flexible than we give it credit for – the lights are usually associated with road traffic, but the different colours can convey an infinite number of meanings when placed in different contexts.
¶ Shopping and assembling
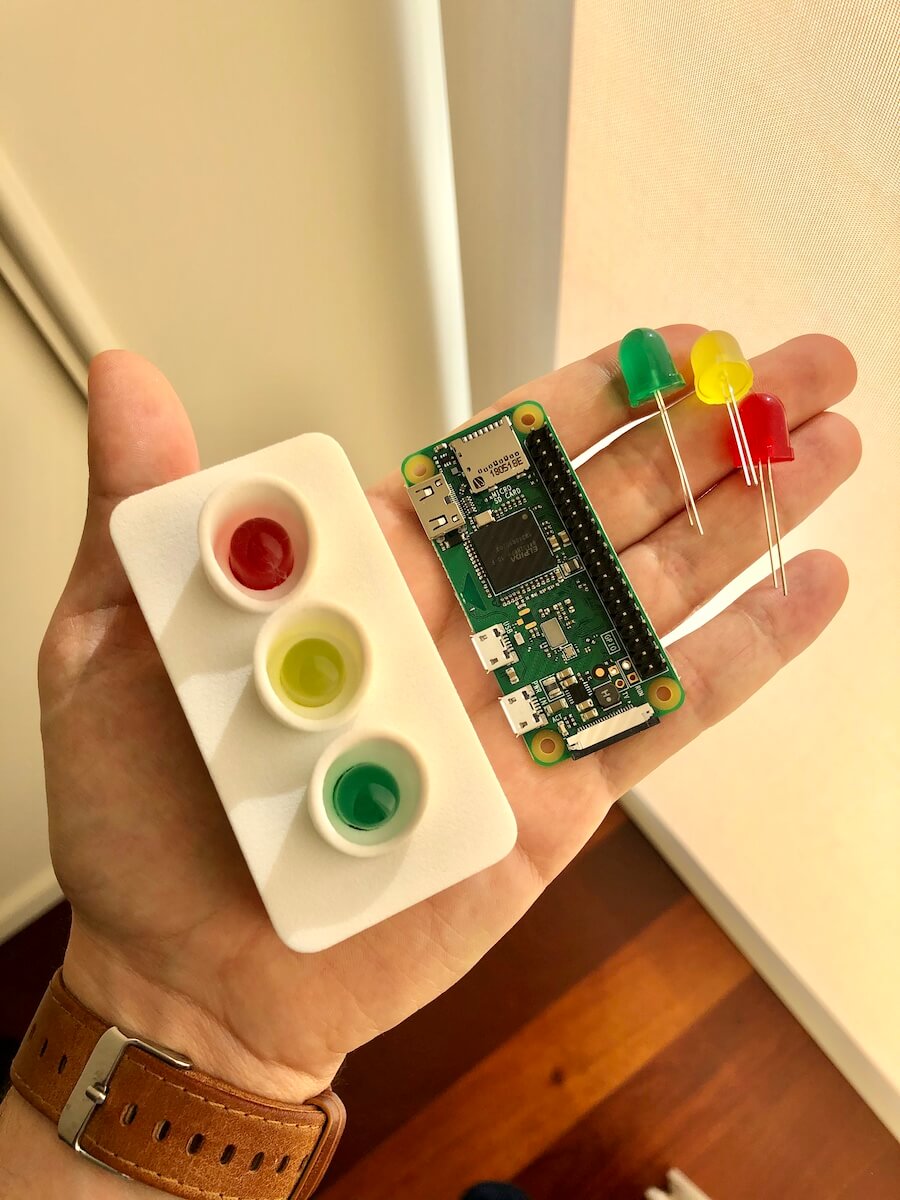
I started doing some research into electronics and hardware. My traffic light would consist of a Raspberry Pi Zero W, a $10 computer not much larger than a ping-pong ball, and three LED lights.
As for the enclosure, I designed it in a vector graphics editor and had it 3D-printed and shipped to me. That was a nerve-racking process, because I didn't know if I had messed something up until I ordered a print and waited a few days for it to arrive at my doorstep. (It's like not being able to test your code until you deploy it to production. Yikes!)
After a failed enclosure design, after reading up on Ohm's law, LEDs and resistors, and after ruining a soldering iron (don't ask), I finally managed to piece everything together and assemble my traffic light. Yay!
¶ Writing the software
With the hardware in place, it was time to write the software for remote-controlling the state of the lights.
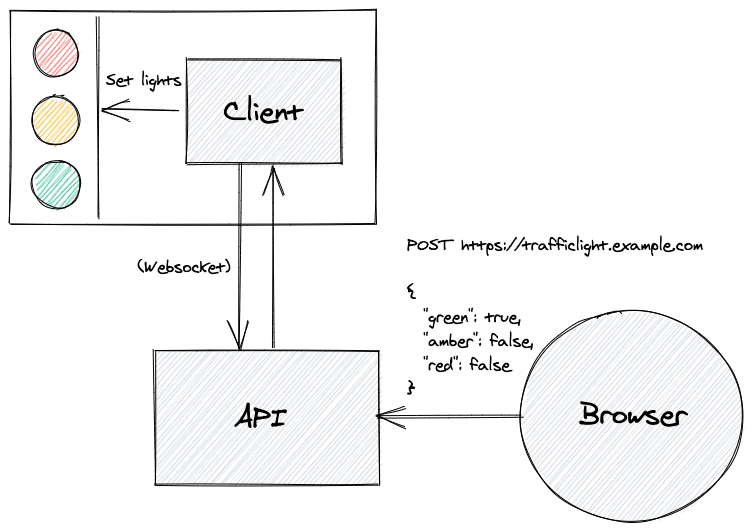
I wanted the device to be connected to the web and controllable via HTTP calls to a public URL. This way, I could easily integrate the device with any platform that supports webhooks.
The Raspberry Pi Zero W has built-in Wi-Fi, which made it a breeze to connect it to my home network and to the Internet, but exposing a public web server is a whole other story. I wanted to be able to plug it into any network and not have to worry about redirecting ports on the router, creating firewall rules and that sort of thing.
Eventually, I decided to create a Node.js app (the client) that I would install on the device, and a central API that I would host on the cloud. This API would then communicate with the client via WebSocket, which uses a single TCP connection for two-way communication and eliminates the issue of being behind a router or firewall.
I've open-sourced the code for the API and client, in case you're interested in having a look.
¶ Integration with Netlify
At this point, I had a public URL that I could ping to set the state of the lights. Now, the sky was the limit!
I'm interested in monitoring the builds on my site, which is hosted on Netlify. Luckily, they have support for webhooks in their Deploy notifications, which lets you configure a set of URLs to hit when a build starts, succeeds or fails.
You can see the device in action in the video below. As soon as I start a build, the amber light turns on; it'll then turn green if the build succeeds or red if it fails.
Netlify is just one of a million possible integrations. I had it hooked up to Travis CI for a while, tracking the build state of a project. You could integrate it with your email provider or Slack account, showing you information about unread emails or direct messages. Maybe you could plug it into your Google Calendar account, to give you an idea of how busy you are for the day.
The possibilities are endless.
¶ Wrapping up
This was a super exciting weekend project and I actually had bigger plans for it. The idea was to improve the software and create an open-source ecosystem of devices, designed and produced by independent makers. People would be able to build integrations, submit designs and order devices online.
Unfortunately, I never got around to working on it, but I still ended up with a pretty neat little device that I can integrate with anything on the web. That's cool. ∎